Showing posts with label Vegan. Show all posts

Wednesday, June 5, 2019

Vegan Almond Milk Yogurt


When I decided to adopt a whole foods plant based diet I was very excited about making all my foods from scratch. Incorporating fermented foods into my diet was no exception. Store bought yogurts usually have preservatived to keep items fresh, so when I saw a video about vegan home made yogurt I researched so many recipes and watched so many versions that I had a hard time choosing which one to try.
I knew an instant pot would be life changing after finding so many other recipes that I was dying to try, so when I saw it had a yogurt option I purchased one immediately! I look forward to posting many more recipes, yogurt being the first:)  

Inspired by Thomas
Ingredients:


Almond Milk
  • 1 cup (140g) raw almonds
  • 3 cups (750ml) filtered water


Yogurts
  • 2 and 1/2 cup homemade almond milk
  • 1/4 tsp xanthan gum
  • Probiotics (60 bill)
  • 2 tsp maple syrup for the probiotics to feed on 
  • Optional: seeds from 1/2 vanilla bean (or 1/4 tsp vanilla extract)
  • For my second batch I added a small amount of agar agar as a thickener, this is a vegan option instead of gelatin


Instructions


Almond Milk
  1. Soak the almonds for at least 6 hours, or overnight. Drain and add to a blender with the 3 cups of water. Blend on high-speed for 30-40 seconds, until smooth.
  2. Place a nut milk bag over a large glass bowl. Pour the almond milk into the bag and twist to close. Using your hands, squeeze to extract as much almond milk as possible. You should end up with about 2 and 1/2 cup of almond milk.


Yogurts
  1. Combine the almond milk (2 and 1/2 cups), xanthan gum in a medium saucepan. If you want to make a sweetened yogurt, also add the maple syrup and vanilla seeds. Heat over medium heat until it reaches 185°F (85°C), whisking constantly to make sure all the gum is fully dissolved and don’t stay at the bottom. Remove from heat at soon as it reaches 185°F, or just before it boils. Transfer to a large glass bowl and let sit for about 20 minutes, or until the temperature reaches below 110°F (43°c). This is important, if the milk is too hot it will kill the cultures. Using a thermometer is strongly recommended.
  2. Once the milk is at the right temperature, stir in the probiotics or yogurt starter. Give it a good whisk to break any “lumps”, and make it fully smooth again. Pour into glass jars and close the lid, or use plastic wrap to cover if you aren't using an instant pot that has a yogurt potion.
  3. Place the jars in a baking dish filled with warm water, they should be half immersed. If you have a yogurt maker, skip this step and just put the jars into your machine.
  4. Place the baking dish with the jars in a 105°F preheated oven for 6-10 hours depending on how sour you like your yogurts. Personally, if you prefer them with a milder flavor so I let them culture for only 6 hours.
  5. Transfer the yogurts to the refrigerator and let cool for at least 8 hours.
  6. Enjoy for breakfast or dessert, sweetened with some maple syrup and topped with granola, fresh fruits, jam or nut butter. Always give the yogurts a good stir before eating!
  7. The yogurts will keep for up to 4 days in the refrigerator.


     Save the almond pult to make something else with it.

     For a thicker consistancy I drained the whey at the bottom
    And for a less thick option I left the whey in one jar and stired it up. They were both amazing! Fresh, with the perfect amount of tang. I enjoyed them with some frozen blueberries and granola.

Sunday, May 26, 2019

Dandy Blend

I'm not a coffee drinker, but I do enjoy a tasty hot drink now and then, and this product has become a recent favorite. A nice alernative to a cup of hot Teechino, which is another favorite. 

I enjoy it with hot unsweetened Vanilla almond milk with a dash of cinnamon.


Dandy blend has an impressive list of benefits and some unique qualities. Here are some of those perks listed by bloomandclementine:

  1. It is easy and fast to make! It dissolves into water and requires no grinding or special preparation. This makes it especially easy in an office setting or for busy mama’s where all you have to do is boil water and pour!
  2. Tip: I add a teaspoon of Cacao (full of it’s own list of incredible health benefits) and a bit of almond milk. This sweetens and adds more flavour if you need it. Although, I find Dandy blend to have a slight natural sweetness to it and I’m even able to drink it black.
  3. Caffeine free! It’s an herbal drink and similarly to herbal teas does not contain caffeine which means you can drink at anytime of the day or night without stimulation or those pesky coffee crashes in the middle of the day.
  4. Gluten free! The roasting and grinding process extracts the gluten proteins from this product and is safe to drink for anyone who struggles with gluten intolerance or celiac disease.
  5. Over 50 trace minerals in every cup! Your body will use these minerals to help boost metabolism.
  6. No headaches or withdrawal symptoms occur when switching from coffee to dandy blend. Dandy Blend reports that many of those who switch over report that they feel they are simply drinking a different brand of coffee!
  7. Dandy blend costs as little at 7 cents per cup! That’s MUCH cheaper than a cup of coffee these days.
  8. Last but not least, I personally think it’s delicious! I am also a happy camper when I can find something so nutrient dense to put in my body!
What got me really excited about this drink is the quality and quantity of dandelion root. This is the main ingredient of the drink as it’s name clearly shows and it comes with many health benefits. Here are 9 different health benefits found from ingestion of dandelion root:

  1. Digestion: Dandelion root is a mild laxative and also balances the good bacteria found in your intestines. It also helps your stomach and liver release stomach acid and bile which keeps your digestion moving properly.
  2. Kidney support: Dandelion is a diuretic which assists the kidneys in flushing out waste, salt and excess water. This can be especially helpful for women who have trouble with bloating during PMS. Instead of leaving you dehydrated from water loss, dandelion will replenish your potassium stores which is an important electrolyte.
  3. Liver support: As mentioned above, Dandelion root helps the liver release bile which is an important function of this organ. This promotes removal of toxins and replenishment of electrolytes.
  4. Antioxidants: It is known that coffee can help remove free radicals but it is also known that dandelion root does this better! Dandelion root is packed full of antioxidants which slows the aging process (while coffee actually accelerates aging).
  5. Cancer fighting: Dandelion has been shown to fight cancer cells and this claim has been backed up with A LOT of research. Every part of this plant is packed with antioxidants and phytonutrients that have been proven to slow the growth and even prevent formation of cancer cells.
  6. Diabetes: This is another benefit of coffee which is listed above, so why not switch over to Dandy blend to have the same benefits PLUS many more! Dandelion helps regulate blood sugar and insulin which is something that coffee actually destroys.
  7. Blood pressure: Dandelion’s diuretic effects leads to more frequent urination which in turn will lower blood pressure. Fiber and Potassium found in Dandelion will also regulate blood pressure.
  8. Inflammation: While most people are aware of the inflammation they can experience in physical injuries, more education is starting to reach people about the issues that internal inflammation can cause. Inflammation is the culprit in many diseases and illnesses today. Dandelion will reduce inflammation through it’s essential fatty acids, antioxidants, and phytonutrients. This reduction of inflammation helps internally as well as externally from sport injuries.
  9. Immune System: If what I mentioned above wasn’t enough, dandelion boosts immune function! It destroys any bugs entering your system so can be especially helpful during the winter months.
What minerals are in Dandy Blend?

According to tests done by Chemical Solutions Ltd., Dandy Blend contains the following minerals on a single serving basis (1 Teaspoon):

Major Minerals:
Potassium 22.2 mg
Sodium 3.2 mg
Phosphorus 2.8 mg
Magnesium 2.0 mg
Calcium 2.1 mg
Iron 0.9 mg
Aluminum 0.05mg
Manganese 0.03


Trace Minerals:
Rubidium 12.0 mcg
Zinc 8.6 mcg
Barium 6.0 mcg
Boron 4.0 mcg
Copper 1.6 mcg
Strontium 2.0 mcg
Chromium 2.0 mcg
Titanium 2.0 mcg


How is Dandy Blend Made?

Dandy Blend is made of only 5 ingredients — extracts of barley, rye, dandelion, chicory and beet roots.
a. the ingredients are dried and roasted separately, each for their own prescribed time. Dandelion roots are roasted at around 230 degrees fahrenheit until they smell like a sweet coffee-hot chocolate mix. b. all five are combined in the proper proportions, and placed in a hot water-filled vat. c. they are allowed to steep for the prescribed period of time. d. the water, with the soluble portions of all the ingredients, is drained from the grounds e. The water portion is spray dried. The grounds, with all the water-insoluble substances, are discarded. f. the powder that remains after the water is driven off is Dandy Blend.

Saturday, May 25, 2019

Tropical Fruit slushie bowl

My most farvorite recent dessert is this smooth, sweet, healthy slushie!

Ingredients:
1 cup Frozen Tropcal fruit Blend (Mango, Pineapple and Strawberry)
1/2 cup frozen Strawberries
1 frozen banana
1-2 cups unstweetened Vanilla almond milk
Granola (your favorite granola...like Nature Valley Oats 'n Honey crunch) 
Monk fruit sweetener (5-10 drops, to your sweetness preference)
2 cups of ice

*Makes at least three decent sized servings, but only 410 caleried for the whole amount!

Directions:
Blend all ingredients except the banana and granola.  Blend until fine and soft.  Chop up frozen banana and sprinkle granola ontop. And you have a cool, sweet, refreshing treat with a crunch.


Thursday, May 5, 2016

Black Bean Burgers with Chipotle Lime Tahini and Guacamole


Ingredients

For the Black Bean Burgers:

  • 1 16 oz can black beans, drained and rinsed
  • 2 tablespoons tahini
  • 8 oz Sweet corn
  • 1/4 cup Sunflower seeds
  • 1  large jalapeno, seeds removed, minced
  • ½ red onion, diced small
  • 3 cloves garlic, minced
  • 1 tablespoon cumin
  • 1 teaspoon chili powder (or to taste)
  • ½ teaspoon Himalayan salt
  • ¼ cup panko bread crumbs
  • organic coconut oil margarine


For the Chipotle Lime Tahini:

  • 3 tablespoons tahini
  • ¼ cup olive oil
  • 2 cloves garlic
  • Juice of 1 lime
  • 2 tablespoons water (I used the juice from the canned corn)
  • sriracha sauce
  • Himalayan salt to taste


For the Guacamole:

  • 1 ripe avocados
  • Juice of 1 lime
  • ½ teaspoon salt
  • 1/2 tomato


Condiments: your preference of burger toppings - these are mine:
  • Lettuce
  • Tomato
  • Ketchup
  • Sriracha
  • Vegenaise

Directions

  1. In a large bowl, combine the black beans with the 2 tablespoons of tahini. Using a fork, mash up about ⅔ of the beans.
  2. Gently mix in the jalapeno, onion, garlic, sesame seeds, and spices. Fold in the panko bread crumbs, corn and whole black beans until well combined, but remember, you don't want to mush up the in-tact beans!
  3. The mixture should come together now, so form it into 4-6 medium-sized patties and make sure they're tightly packed together.
  4. Place the patties on a parchment lined baking sheet and refrigerate for an hour to help them hold together.
  5. As you wait for the patties to be ready, make the tahini by combining all of the sauce ingredients in a food processor or by hand. Refrigerate until ready to serve.
  6. To make the guacamole, mash the avocados and cover with the juice of 1 lime. Then, mix in the tomato and salt to taste.
  7. When the patties are ready, add a few tablespoons of coconut margarine or oil of your choice over medium/high heat in a cast iron skillet.
  8. Once the oil is hot, add 2-3 burgers to the skillet, making sure there is plenty of room to flip them. Cook for around 5 minutes, longer or shorter to your liking (the thicker your patties, the longer they'll need to cook). Flip carefully and cook for a few minutes minutes on the other side, until brown and cooked through. I then moved it to the pan where I sauteed my onions and mushrooms, then added some of the Chipotle sauce on top. Cooked for a minute and flipped, then added another drizzle.
  9. Serve the burgers with lettuce, tomato, the Guacamole, and any other condiment of your choosing. I added some vegenaise, organic ketchup, sriracha. Instead of a burger bun I used a Pita bread, this made it a lot easier to eat since bean burgers tend to all apart, especially since I included corn and no gluten to hold it together. 
 All Ingredients
Mix 3/4 of the black beans with 2 Tablespoons of Tahini
 Add in the jalapeno, onion, garlic, sesame seeds, and spices.
 Mix well
 Fold in the panko bread crumbs, corn and whole black beans until well combined
 Form nicely packed patties
 Saute some onions and mushroom in oil with a little bit of garlic as a topping
 Cook until they're perfect to your liking...I cooked them a little longer
 Heat up oil and when hot add patty
 Flip after a few minutes
 I then transferred it to the pan that I used to saute to the onion and mushrooms
 Once all the preparation is done it's time to put it all together!
 I placed the bean burger on half the pita bread, and topped it off with the onion and mushroom and a tiny drizzle of the Chipotle sauce. On the other half I placed some lettuce, tomato and guacamole.
 It was delicious as above! But I upped it on the scrumptious scale and added some ketchup, more sriracha sauce and some vegenaise.
 Believe it or not, this was doable for me to take bites...it was Super messy but heavenly! It definitely helped to have it folded in a pita rather than a bun with all open sides.
Mmm mmm mm...worth the effort!

Tuesday, May 3, 2016

Spaghetti Squash Chow Mein (tofu)

 Vegan and Gluten-Free (8 simple ingredients)

Ingredients
  • 1 large spaghetti squash
  • 1/4 cup soy sauce or tamari (or coconut aminos to make paleo)
  • 3-4 cloves garlic, minced
  • 1 tablespoon brown sugar (or coconut sugar)
  • 2 teaspoons freshly grated ginger
  • 2 tablespoons olive oil
  • 1 red onion, diced
  • 3 stalks celery
  • 2 cups shredded cabbage (or coleslaw mix...I didn't have any)
  • Cilantro 
Directions

Cut a spaghetti squash in half length wise and scoop out seeds. Lay skin side up in a 13 x 9 pyrex and pour 1/2 inch of water in the bottom of the pan. Bake at 400 degrees for 30-40 minutes, until flesh is very tender. Once done, scoop out flesh with a fork so it breaks apart into strings, set aside.


In a small bowl, whisk together soy sauce, garlic, brown sugar, and ginger; set aside.

Heat olive oil in a large skillet over medium high heat. Add onion and cook, stirring often, until tender, about 3-4 minutes. Stir in cabbage an celery until heated through, a few minute. 

Stir in spaghetti squash and soy sauce mixture until well combined, about 2 minute. Turn off heat and top with chopped up cilantro.

Serve immediately, and enjoy!

Notes - I reheated some left over tofu to top it off for a little more protein.  


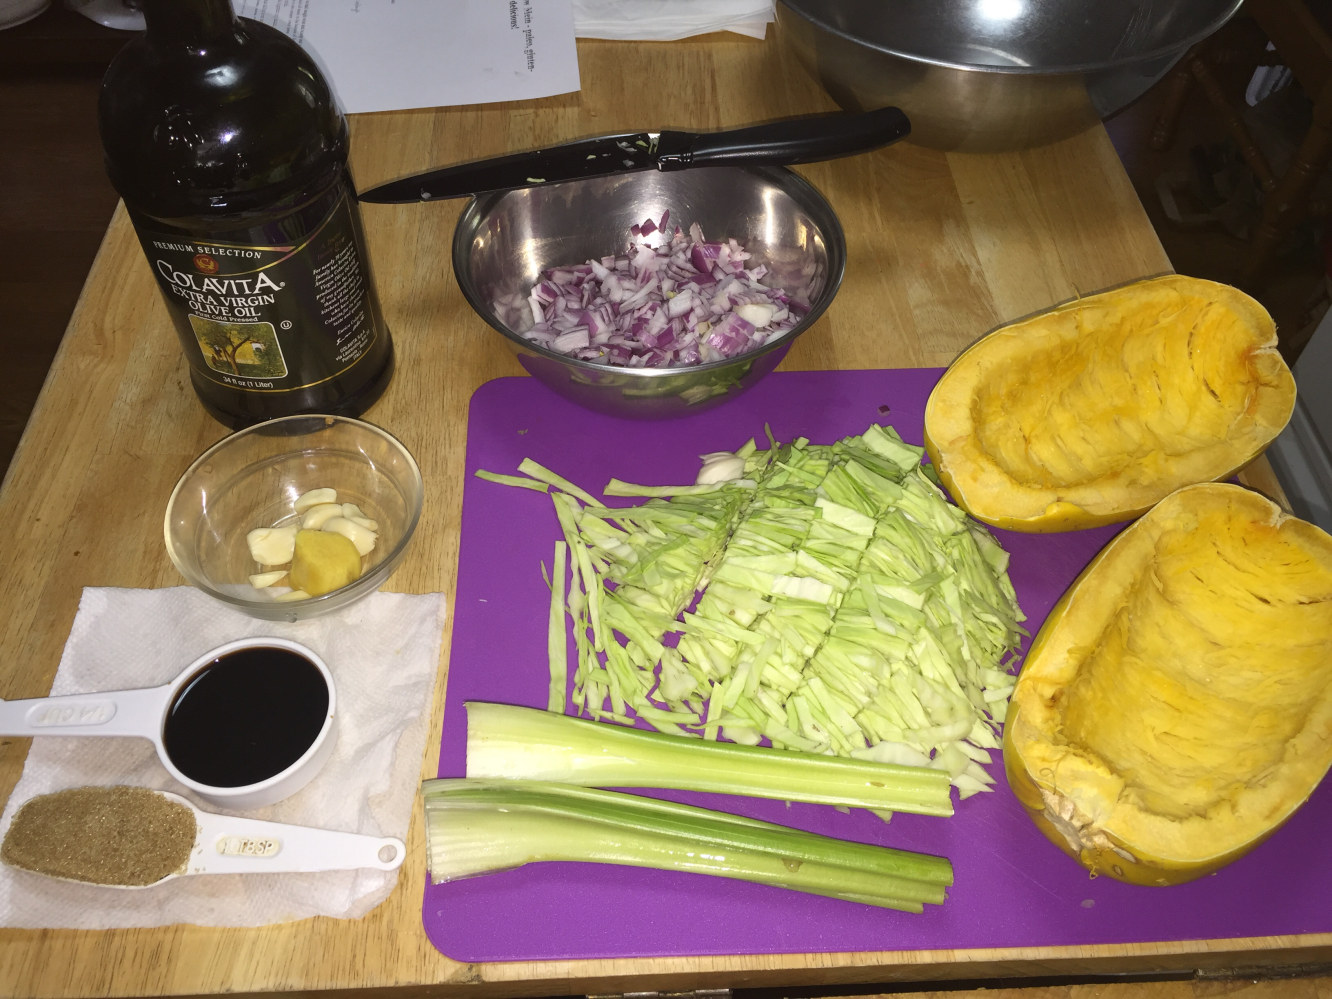
 All Ingredients - Olive Oil, Coconut Aminos, Celery, Garlic, Ginger, Cabbage, Red Onion and Spaghetti Squash
 Chopped up and mixed ingredients.
 Add in cabbage and celery after onions have cooked
 Then add in spaghetti squash
 Add the sauce on top of the spaghetti squash and mix well
 Mix well and cook until well blended and consistency to your desire.
 Turn off heat and top with cilantro
 Serve and garnish with cilantro and Sriracha sauce for a kick
 I had some left over Chinese food, some tofu
 This dish is absolutely delicious! A great alternative to noodles! So much more healthy.

Monday, April 25, 2016

High Protein Veggie & Coconut Quinoa recipe

Beans, quinoa, zucchini, cauliflower, coconut curry dish


Ingredients
 

1 cup quinoa
Can of organic mixed beans (kidney beans, white beans, Garbanzo beans)

1 can coconut milk
1 can organic corn

Veggie Broth
1 large red onion
1-2 tomatoes
½ head of Cauliflower
2 small zucchini
1 Tbsp Coconut oil
Garlic/ginger
1 tsp Cumin seeds
1 tsp Black mustard seeds
1 tsp Cumin powder
1 tsp Coriander powder
½ tsp Madras curry powder
½ tsp Himalayan salt
Cilantro
Pecans 
Sriracha 

*Note - When taking directions photo I was out of the bean mix so used a can of kidney beans. I was also out of cilantro (which I consider an essential
 

Directions

Cook quinoa in a small pan.  Add twice as much water or veggie broth to cook the quinoa. Heat it up on high until it boils, then reduce heat to a simmer and cover for 15 minutes. After 15 minutes turn off heat and keep lid on, it will absorb all remaining liquid. If it seems to dry out before the white dot disappears on the quinoa seeds add a little more water during cooking time.

Heat coconut oil in pan with freshly crushed cumin seeds, black mustard seeds and garlic/ginger.  Add in finely chopped red onion. Cook on medium high heat for a few minutes. When the onions seem to dry out on the pan add the finely cup up tomato and stir in for a couple of minutes. Blend in all the spices well, then add chopped up cauliflower and zucchini. Stir well. When coated and cooked for a few minutes add the can of coconut milk and about a cup of veggie broth on high heat until it boils, then turn down to medium high. Stir and simmer for about 8 minutes, or until veggies are soft to your liking, do not overcook. Turn off heat.  Add chopped up cilantro, cooked quinoa and rinsed canned beans. The heat is enough to heat up the beans, as they’re already cooked if you use canned beans. Let it sit for a few minutes covered.  It’s ready to eat! It’s delicious as a thick dish or with more liquid as a very chunky stew. I like my food spicy so a squeeze of Sriracha sauce perfects the dish for me. Break up some pecans and garnish. 

All ingredients, veggie broth not in photo
Cooking quinoa

Heat coconut oil with green chili, crushed cumin and black mustard seeds
Add in onion and saute for a few minutes
Then add in tomatoes and mix well for a couple of minutes
Add in all spices
Cook until well mixed
Add in Cauliflower and Zucchini
Mix in the can of coconut milk until well blended
Then mix in Vegetable broth
Add as much veggie broth to cover vegetables and cover to let simmer until veggies and tender but not too soft
Quinoa should be ready at this point
Add in beans and corn with the liquid and mix in well
Turn off heat after one minutes
Add in the cooked Quinoa and mix in
Add sriracha and chopped up pecans on top...ready to eat!
(from previous batch other than ingredient photos)
Delicious with chopped up pecans - I added more veggie broth to this portion, don't add more moisture if you prefer it more chunky (from previous batch other than ingredient photos)